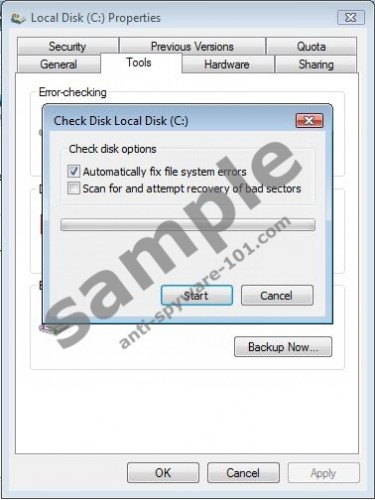
What is How to Remove Disk Errors?
Your computer can stop performing efficiently if an error on the hard disk occurs and the computer suddenly shuts down. To check for errors and boost the performance of your computer you can always use a registry repair tool. On the other hand, you can run the Window Error-checking utility to find errors and solve the problem. Read the following instructions on how to find and use the tool:
Windows Vista and Windows 7
- Log on to your OS as an Administrator.
- Open the Start menu and select Computer.
- Right-click on the disk you want to scan and select Properties.
- In a new window, select the Tools tab and then Check Now. Choose from three options:
- The tool will detect and report any error detected if you check the option Automatically fix file system errors.
- If you choose the option Scan for and attempt recovery of bad sectors, a detailed scan will be run in the system.
- If you check the two options, the system will be scanned for both physical and file errors.
- Press Start.

Windows XP
- Open your Start menu and then open My Computer.
- Right-click on the disk you want to scan and select Properties.
- Select the Tools tab.
- Click on the Check now button in the Error-checking area.
- Check Automatically fix file system errors and Scan for attempt recovery of bad sectors and press Start.
- A new window will inform you that you can arrange a schedule of an automatic scan of the disk. Click on Yes.
Download Automatic Errors removal Tool:


0 Comments.